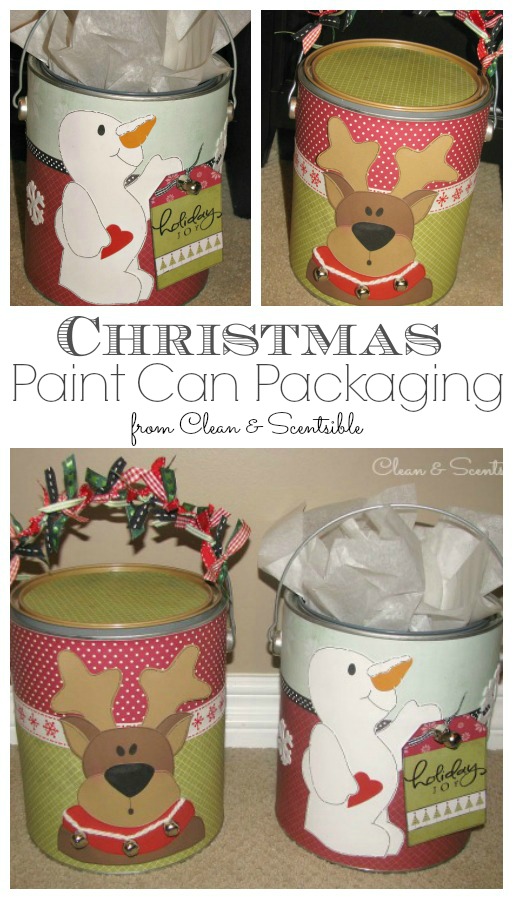
If you are looking for a unique way to wrap up some of those Christmas gifts, just grab a paint can and some basic scrapbook supplies. These cute paint can packaging ideas will definitely be a hit!


Again, if anyone is interested in the paper piecing patterns, I am happy to share. Sorry I couldn’t figure out how to upload them on here but email should work!
Materials
- Paint cans. Although these are available at many craft stores, they are much cheaper to purchase through a paint store directly. Mine were $2.50 each.
- Scrapbook paper
- Jingle Bells
- Ribbon
- Glue (double sided tape is also helpful)
- Modge podge
- Snowman or reindeer (or whatever else you would like!) paper piecing pattern. If you would like a copy of mine, just let me know and I can email them to you (or if someone knows how I could upload the pattern on to here, that would be great too!). There are also some cute patterns at Scrapbooks Etc. that you can find here.
Directions
- To cover the paint can, I used 2 different colours of patterned scrapbook paper. My paint can was approximately 8 1/4 inches high. For the bottom half of the paint can, I cut 2 pieces of paper that were roughly 4 1/2 inches x 10 1/2 inches. For the top half, I cute 2 pieces roughly 4 x 10 1/2 inches to allow for a little bit of overlap.
- Start at the top of the paint can and place the first strip of paper around the can so that the ends of the paper roughly line up with the part of the paint can where the handle attaches. You will need to cut out a section on each end of your paper to account for the round bit. (This is the only tricky part!). If you are making multiple paint cans, you just need to do this step once to make a good template. You can then use this first piece as your template and trace onto all of your subsequent pieces.
-
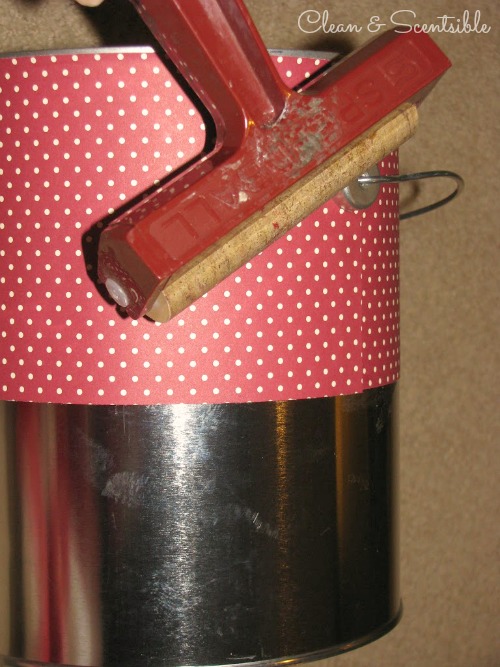
Once your have your pieces cut, paint a generous amount of modge podge onto the paint can and glue down your pieces. I always use a little roller over the paper to really secure it down. If you don’t have a roller, make sure you take a few minutes to really press down the paper and get all of the bubbles out.
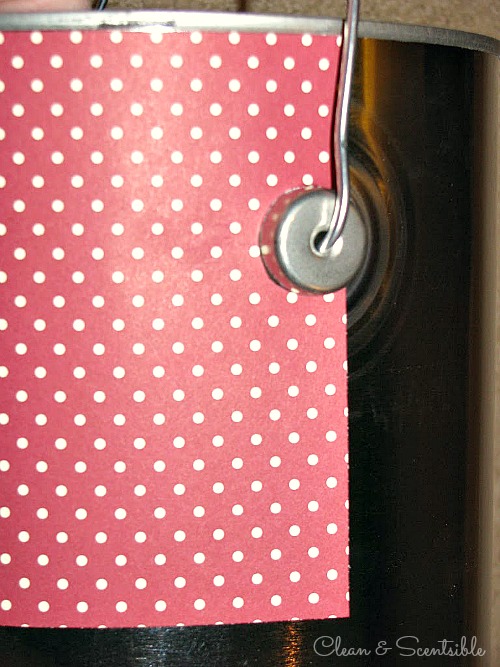
- Once you have all 4 pieces of paper glued down with the modge podge, put a piece of ribbon around the can to cover where the two pieces of paper overlap. Have the ribbon seam end where you are going to place your paper piecing pattern so it will be covered up. You can either glue the ribbon down or use double sided tape (which I found much easier!).
-
Next you will need to find or create something to put on your paint can. I made a couple of paper piecing patterns of a reindeer and a snowman (just let me know if you would like a copy!) Cut out all of the pieces from your pattern and trace it onto whatever colour cardstock you would like. Glue all the pieces together.
- For the Reindeer, draw on some eyes and a mouth. I used a little chalk on the cheeks to make them a little rosy. I also outlined all of my paper pieces in a fine black pen just to make them stand out a bit more. To finish him off, I tied three bells to a piece of yarn to use over his collar ( I just taped the ends of the yarn to the back of the reindeer). Glue him on (with lots of glue!!) to the can.
- For the snowman, I also outlined all of the paper pieces with fine black ink. Draw on an eye and his mouth and glue him down to the can. Punch a hole in the tag and add a ribbon and a couple of jingle bells. Glue down the tag onto the snowman’s hand. I had a couple of felt snowflakes that I also added to the can for some extra decoration.
-
Depending on what you are going to be putting in your can, you may want to decorate the lid, add some ribbon to the handle, or just add some tissue paper.
Although the directions, seem really long, they are really quite easy to do. If you are making a few of them at a time, it does tend to go quicker! I love how they look and the lucky recipient can always use them afterwards for decoration or storage. I think they make a great kitchen caddy!
Again, if anyone is interested in the paper piecing patterns, I am happy to share. Sorry I couldn’t figure out how to upload them on here but email should work!
Hi Jenn! You gave me one of these paint cans at a ornament exchange party a few years ago and I love it! I have used it for many things at Christmas time; always displayed in my home. I have even put rolled up face clothes in it for guests to use as hand towels in the bathroom, but this year I am thinking about putting a little poinsettia in it…..I just better be careful not to get it dirty! Thanks again. It’s super cute and I always get comments on it. From “the other Jen”.
Oh my goodness these are just adorable!! I love the snowman 🙂
Thanks so much for linking up to SS@
Hannah @ http://youngancrafty.blogspot.com/
Jenn, these are just adodrable. I have wanted to make this for Christmas but was unsure how. Now you have solved my problem!!! Thank you for the idea. i would love to have the deer and snowman pattern if you don’t mine. Thanks again
Betty
honeebee52@yahoo.com
They turned out so dang cute… I am going to have to try to make one… thanks for sharing!
Thank you for sharing this great tutorial. I want to make some with goodies to give as gifts this Christmas. I would love to have the deer and snowman pattern as well.
Rosella
rqp444@gmail.com
These are so adorable. What a creative, crafty, cute idea! I would love to have the snowman and reindeer pattern also. Love your blog!
Tina @ http://www.thecountryheart.blogspot.com
tinapowers3@hotmail.com
Thank you! Happy Thanksgiving!!
I love this adorable idea. I can’t wait to begin decorating a few!
xoxo
Kelli @
loveoursimplelife.blogspot.com
Those are adorable!!!
These are beyond adorable! I do so much sewing it would be a lovely change of pace to do some gluing instead! Thanks for sharing. I’ll be linking on Facebook 🙂
Awww these are just so gorgeous, Id love to have a go, could I please have the Reindeer and Snowman please.
christine.lockley@blueyonder.co.uk
Thank you so much, keep up the great work, you really are an inspiration
I like this idea. The snowman is my favorite! I’d love to have you link it up to my gift wrap/gift linky party.
Have a great Thanksgiving!
REALLY super darling!!! Another great link to Thrilling Thursday @ Paisley Passions! Thanks for linking up!
these are great! thanks for the idea!!
Are really beautiful, full of creativity.
Congratulations!
Bjs
Lele
Sorry,
I invite you to visit my blog:
http://jlartesanatos.blogspot.com
Such a cute idea. I just found your site thru http://youngancrafty.blogspot.com/.
Can you please email me the pattern at tenderholts at gmail dot com? I don’t see your email address to request directly.
Thanks and keep up the great craft ideas.
Those are so adorable! I’d just take the can as a gift; it would make for cute decor. Fabulous job on the paper piecing of the reindeer and snowman, wish I had that talent. Thanks for linking up to Scrappy Saturdays! Featuring this today.
This is a fabulous gift idea!!
I love it!!
You could stick about anything in there…or nothing…it makes a great gift on its own!
Thank you so much for linking it up at Paper Issues!!
=)
Awww!!! I love this! What a great use of an old paint can. Plus, they are just too darn cute:)
These are adorable!!! They would make great gifts for my girls. If you would I would love it if you emailed me the pattern at poohzbr@yahoo.com
Thanks
Tamara
I love love love these!!! I would love to have the deer and snowman pattern! Looks like I have new projects to do now….. Thank you so much for sharing with us! My email is: melpn97@hotmail.com
I think these are absolutely soooooo cute!
I would love the pattern to the reindeer, living in the tropics the snowman is far from believable. But still extremely cute.
inrb@aapt.net.au
Thanks
Rikki
Would you be able to email me the pattern for the reindeer please? the5bloods@zoominternet.net
Jenn, these are precious! They would be sooo cute for my kiddos in pre-k (and for myself)! I would LOVE both patterns if you have them handy. Thanks so much.
cdavis8126@bellsouth.net
Please email me the both patterns. They are adorable. I think they would make great teacher gifts. Thank you, Brenda
breezie1@peoplepc.com
I love these! Would you please e-mail the reindeer and snowman pattern to me if you still have them! Thanks so much. dinavanhoudt@gmail.com
Dina
I just love this idea. It would make terrific Teacher gifts. Would you please email me the patterns if you still have them available. Thank you for your time.
Califun4me@aol.com
Thanks again,
Adrienne