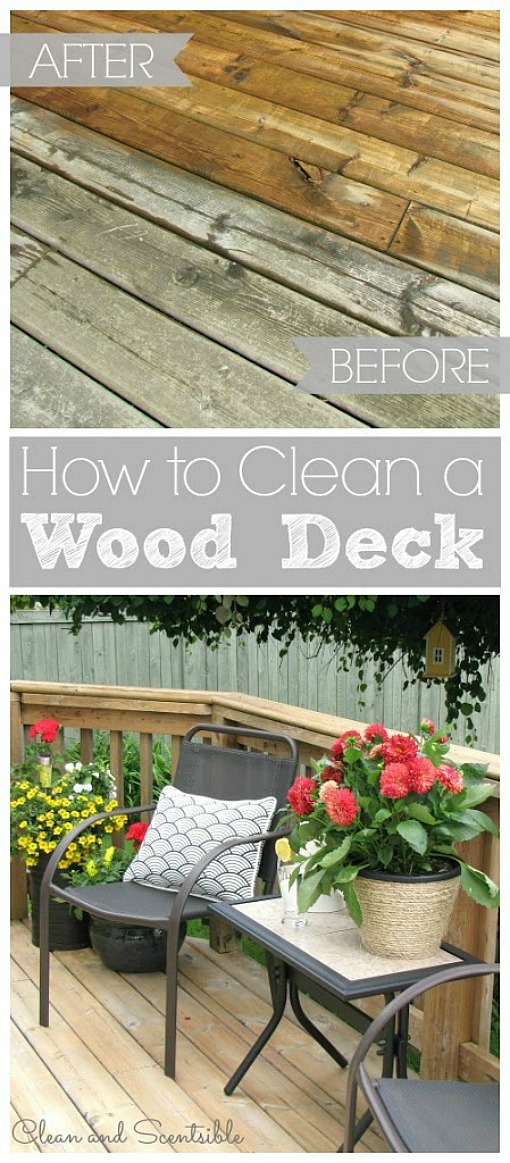
One of my tasks for my June Household Organization Diet was to clean our wood deck. It’s been a long couple of years since we have done this so it was definitely in need of some serious TLC.
Depending on the size of your deck, you will likely need to complete this project over a few days. And make sure to check that the weather forecast is good! 🙂
Depending on the size of your deck, you will likely need to complete this project over a few days. And make sure to check that the weather forecast is good! 🙂
STEP 1 – POWER WASHING
Due to how dirty our deck was, a deep power washing was definitely needed. {NOTE: If you have maintained your deck well, you may not need to do a deep power washing and can just start with step 2}. For our deck, we used a Karcher1800 PSI High Pressure Washer.
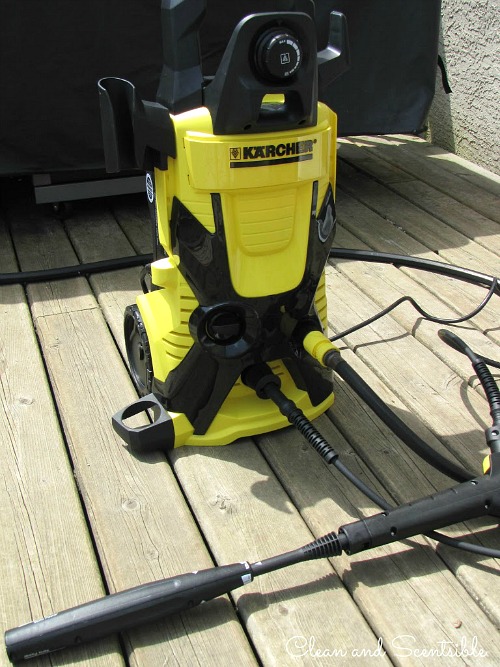
As tempting as it is to get right in there and blast off all of that dirt and mildew from your deck, a power washer can do some major damage to your wood if you are not careful. Here are a few tips to keep your wood from getting blasted away…
- Use a fan tip and keep the tip at least 12 inches from the surface of your deck {you may need to be even further away depending on the strength of your power washer}
- Use as low a pressure as possible while still being effective to avoid damaging the wood. Depending on the type of wood that you are working with, anywhere from 500psi to 1500 psi is recommended.
- Engage the trigger away from the deck. Use a “swooping” stroke to bring the spray of water down towards the deck to avoid any start and stop lines.
- Make sure that you keep a consistent distance between the tip of the sprayer and your surface to ensure a more uniform color on the deck. If the fan is too far away, it will result in a less clean surface and if it is too close it will start to strip the wood. This can result in discolorations and lines.
- Spray along the grain of the wood by feathering your spraying lengthwise over the boards and overlapping each area slightly.
- Try and work out from the corners and from the house outwards.
It really is amazing the difference the power wahsing made! I didn’t even remember our deck being that color!

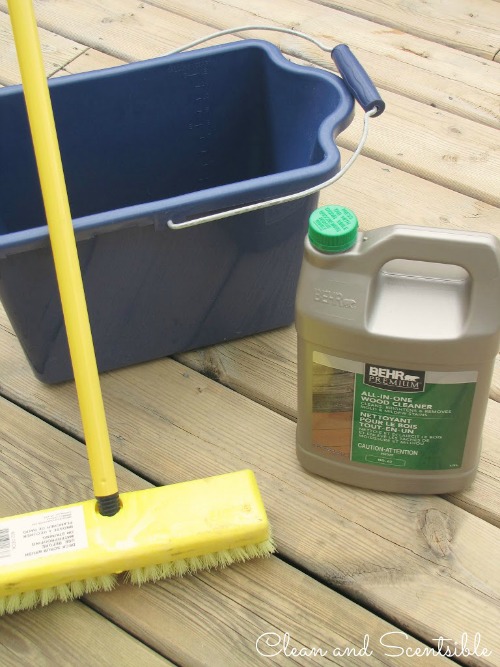
Yes, I know that we just cleaned it with the power washer but the wood cleaner helps to brighten the wood up a bit and the scrubbing action from the brush can help to take away any loose wood fibers that were brought up from the power washing. You will need a wood cleaner of your choice, a plastic bucket to mix the solution in, a power washer (on low pressure) or garden hose, and a synthetic, stiff bristle scrub brush. It’s helpful if the scrub brush screws off of the end of the stick so you can use it for the railings as well.We went with Behr All-In-One-Wood-Cleaner but there are a variety of cleaners out there. They all seemed to have slightly different instructions for application so be sure to read the directions thoroughly before starting. Most require you to wet the deck prior to use. Do not let the cleaner dry completely on the deck before rinsing.
STEP 3 – SAND
No matter how careful you are with the power washing, you will likely have some raised wood fibers {especially if you are working with a softer wood} that will need to be sanded down. Not only can these cause splinters, but they can also lead to your wood cracking through the colder and wetter winter months. If you have any lines in your wood from the power washing, the sanding will also to help to minimize this.Once your wood has completely dried, use an orbital sander to sand it down and remove all of the loose fibers. We used 80 grit sandpaper on the deck itself and 100 grit sandpaper on the railings. A higher grit sandpaper is not recommended as this can limit the amount of absorption of the sealer or stain into the wood. The wood grain should be level and smooth when you are finished.
STEP 4 – SEAL, STAIN, or PAINT
Allow the deck to dry for a full 48 hours and check the weather forecast to ensure that it will stay dry for at least 48 hours afterwards sealing or staining. We like the natural color of the wood so we are just going to use a sealant over top of our deck. Alternatively, you can purchase wood stains of various colors and translucency or outdoor paint.

We have had an amazing start to our summer and the weather has been perfect for lounging outside and relaxing with a nice book. I am definitely happy to have this project completed!
Are you new to The Household Organization Diet? You can find the first post HERE and get caught up on all of our past projects over HERE. Now is the time to get organized!!! 😉
You can connect with me here…
STEP 4 – SEAL, STAIN, or PAINT
Allow the deck to dry for a full 48 hours and check the weather forecast to ensure that it will stay dry for at least 48 hours afterwards sealing or staining. We like the natural color of the wood so we are just going to use a sealant over top of our deck. Alternatively, you can purchase wood stains of various colors and translucency or outdoor paint.
We have had an amazing start to our summer and the weather has been perfect for lounging outside and relaxing with a nice book. I am definitely happy to have this project completed!
Are you new to The Household Organization Diet? You can find the first post HERE and get caught up on all of our past projects over HERE. Now is the time to get organized!!! 😉
You can connect with me here…


Looks great Jenn! I am totally sharing this with my parents who have a wood deck; they are always talking about cleaning it! Thanks! 🙂
Wow there is such a difference. Great job. Love your deck!!
Wow what a difference!! Good to know 🙂
perfect timing! my husband and I were just talking about cleaning our deck!
Thanks for linking up! I’ve featured your post in my wrap up http://tidymom.net/2013/creative-summer-ideas/
have a fabulous rest of the weekend!
Thanks for the great tips!! The deck looks beautiful! We need to pressure wash our patio, I think it would make such a difference. Did you buy this one or rent one?
Shawna
Come by my link up party–Weekend Beautful to share your project if you are interested, I would love it 🙂
http://dakotacreekchic.com/weekend-beautiful-blog-party/
Wow, what a difference! I know ours needs to be done, but I’m dreading it. It’s on the second story, so it’s going to create even more work as it drips to the patio below. Waiting for the weather to cool off before checking that off the list. Thanks for your tips! I’m visiting from the Craft-O-Maniac link party.
Christy @ Creating a Beautiful Life
Wow your deck looks amazing!
Your deck looks great now that you have cleaned it and resealed it. I am sure that your whole family loves spending time on it now.
Great write up, I always use Burmese teak oil for refinishing, it gives a nice subtle reddish hue to hardwood.
Good to know!