Right now I am working on decorating one of our walls in our main hallway. This wall has been a thorn in my side ever since we moved in as it has the thermostat and home alarm awkwardly placed almost in the middle of the wall. Well I have finally figured out a solution that I like {more on that next week} and have been working on a few little projects to add to the space…
I love photo canvases but the cost of ordering one can often be quite costly especially since I like my photos big! This DIY version is an easy and much cheaper option and gives a very similar look. I generally buy our canvases at one of our local discount stores {the prices are all under $10} but you can find often find some great deals at the major craft stores as well.
Materials
- canvas {mine is a 20×26}
- photo of the same size {make sure that it is a MATTE finish rather than glossy}
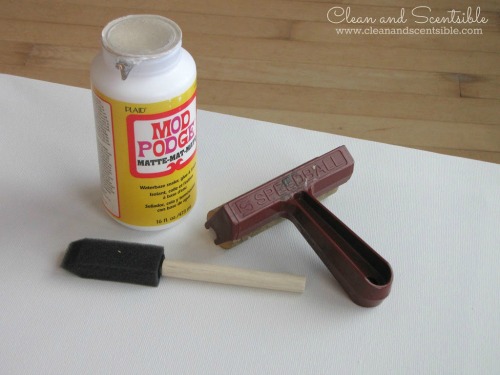
- mod podge or Quick Grip Glue
- sponge brush roller
- sanding block
- Before you start, place the photo over the canvas and make sure that it does not need to be trimmed down. The canvases are not always even and I do occasionally trim the photos down slightly. Do not worry if it is not a perfect match.
- I often like to paint the edges of the canvas out in a darker color {although I did not do it with this project}. If you want to paint, paint the edges of the canvas with a slight overlap onto the front of the canvas.
- Spread the mod podge evenly around the canvas with the sponge brush, paying close attention that you are getting the corners and the edges as well.
- Place your photo carefully on top of the canvas. Using a roller {you could always use a rolling pin or cup as well} roll along the edges of the photo. Turn the canvas over and roll over the back of the photo to get rid of any little bubbles.
- Take a sanding block and sand along the edges of the photo {just sand down rather than up and down so the photo does not lift off}. This helps to blend the photo more into the canvas.
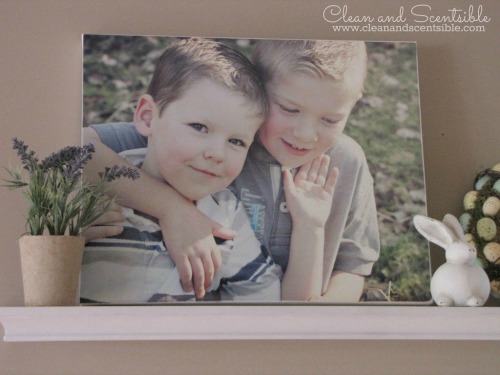
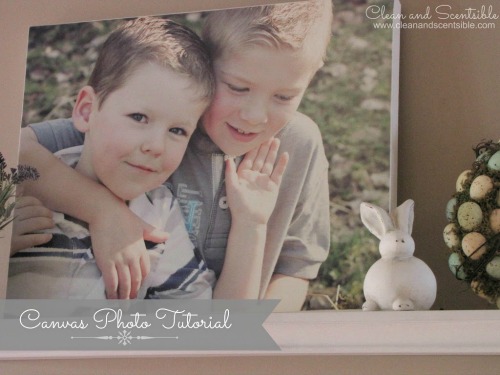
Not too bad for a 5 minute project! And really – who can go wrong with those cute faces? 🙂
I also like stacking canvas photos on a large one…
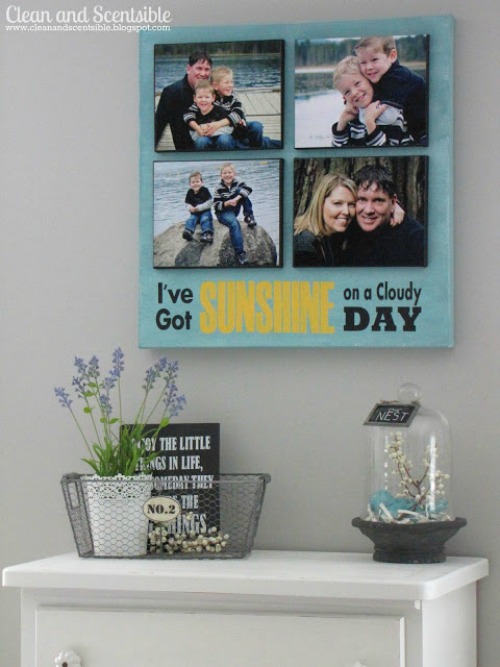

If you are looking for more canvas ideas, you can find more projects HERE.
A great idea to showcase your favorite images! Thanks for the tutorial!
What a great project…oh those sweet faces!
I love this project!! How do I pin it to Pinterest; I see all the other buttons, but I don’t see a Pinterest one! Also, I am making the art canvas bunny butt!! First one, on 8 x 10 canvas, I was able to enlarge my initial 2″ drawing of yours, BUT now I want to put it on a 16×20 and that size won’t cut it!! I need it bigger and do not have any silhouette patterns. None of my Cricket carts even have a bunny, let alone your cute bunny butt one. Any suggestions? I continue to love your site and ideas! You are so creative and what adorable boys!!
What an incredible project, really great. Exceptional tutorial.
Love your little boys, they are so sweet and adorable. Do you wish you could keep them so young for awhile? Love how you put it all together. I hadn’t heard of photo canvases until I started reading blogs, really like how they look and how you made it.
wow will pin this….great idea
Newest follower here! I found you through the blog hop. You have a super cute blog, I can’t wait to read more. You can find me at meandmr.com
-Melanie @meandmr.com
Thanks!
Jenn, I love this idea. Thanks for sharing it. I have the perfect wall that is just crying out for more “stuff” to be hung on it. I think I will try this.
These are amazing! I love the dimension on these. Also, your blog are beautiful! Do you use a DSLR ~ or just a great photo software? I’m working on better blog photos. TFS!
I found you today at the I Heart Naptime Linky. I hope you can stop by my blog and leave a comment, too!
~ Megin of Vmg206
http://www.vmg206.blogpsot.com
Wow, these are awesome! Those photo canvasses are not cheap if you buy them. Thanks so much for linking up to Monday Funday!
Kelly @ view along the way
Those turned out gorgeous! Wonderful job!
Love these! Can’t wait to try this at home! Pinning!
Hi Jenn! Such a great idea! Sorry to be a dummy but do you have the photo printed on matte photo paper at a regular photo place? And if you want the project bigger just order the photo bigger? Thanks. I saw your post over at “Stone Gable” blog party.
I love all of these! Thank you so much for sharing. Pinning them.
I loved them all, It is very special and easy! 😀
Pin pin pin it!
Cami
These all look great! I need to try out this method with quite a few photos SOON!!
Hi, I saw your page and I like it, I need something like that , I want to start a page as your ans recently I asked a web design company ELCO PLANET (www.elcoplant.com) to develope the page for me.. I was just interasted for web hosting..I can see your blog,is stable, can you please advice me about web hosting provider..have you ever heard for http://www.elcoplanet.com offering hosting, alfa reseller hosting… ? thanks a lot
These look great! It helps that you have such an adorable family, too! 🙂 I definitely want to try this!
How fantastic! I need a roller… my mod podge always has bubble in it! I just wrote about some Picture Picture frames, and yup…there are the bubbles! Love it anyway…
Great DIY idea instead of buying the expensive ones. Love the last one with the words.
Beautiful! What a great way to showcase your adorable boys!
Such a sweet photo Jenn! Pinning and sharing your tutorial on Facebook this weekend : )
Liz
Just stopping by to let you know that you were featured yesterday at Time To Sparkle! We will be sharing your post on Facebook, Pinterest and Twitter! http://www.thegunnysack.com/2013/04/time-to-sparkle-tuesday-link-party-3.html
I was looking for a DIY canvas project and suddenly come across this post, you shared a great project here, it’s really a great project, thanks for sharing..
Superbly design Canvas Prints online
This comment has been removed by the author.
canvas is really a great thing for giving any photo much attractive look, this is really a great diy canvas making tutorial, thanks for sharing..
http://cavansartprint.wordpress.com/2013/06/18/watch-out-for-limited-edition-art-on-canvas