Happy Friday! I hope you have all had a great week. We had a new scrapbook store open up in town last month {Cherry Lane Scrapbook Shoppe if you happen to live close to Mission!} and I finally had a chance to make it in for a visit. I tend to go a little crazy with the paper around Valentine’s Day as it is one of the only times that I get to work with pink. {My boys are great but they are just not into pink!} I picked up some great My Mind’s Eye and Echo Park Valentine’s products and couldn’t wait to get started!
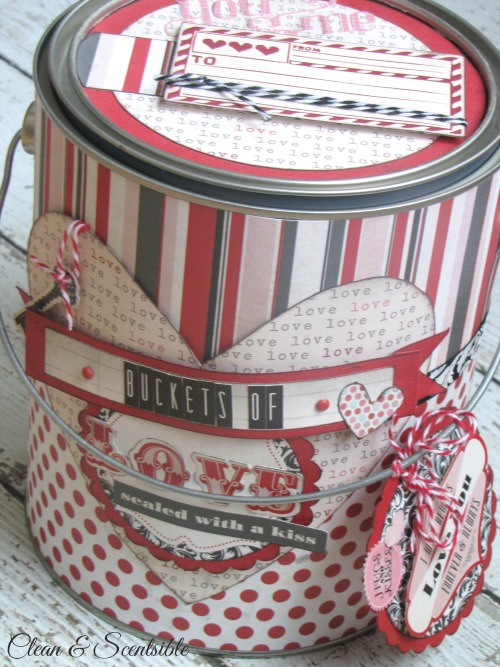
If you are looking for some creative Valentine’s Day packaging ideas, I always love dressing up paint cans. At Valentine’s Day you can fill them with chocolates, handmade goodies, favorite little gifts, love notes, or activity coupons. Just use your creativity!
They are easy and relatively quick {depending on how picky you are!} to make. You can pick up paint cans pretty much everywhere that sells paint for around $3. Cut down your scrapbook paper so that the seam lines up roughly with the middle of the round knob. The only part that takes a little fiddling is cutting the holes around the handles. For the body of the bucket you will need:
They are easy and relatively quick {depending on how picky you are!} to make. You can pick up paint cans pretty much everywhere that sells paint for around $3. Cut down your scrapbook paper so that the seam lines up roughly with the middle of the round knob. The only part that takes a little fiddling is cutting the holes around the handles. For the body of the bucket you will need:
- 2 pieces of scrapbook paper for the bottom of the can {approximately 10 1/2 inches x 4 3/8}
- 2 pieces of coordinating scrapbook paper for the top of the can {approximately 10 1/2 inches x 3}
- ribbon or 2 pieces of thin coordinating scrapbook paper to cover up the seams
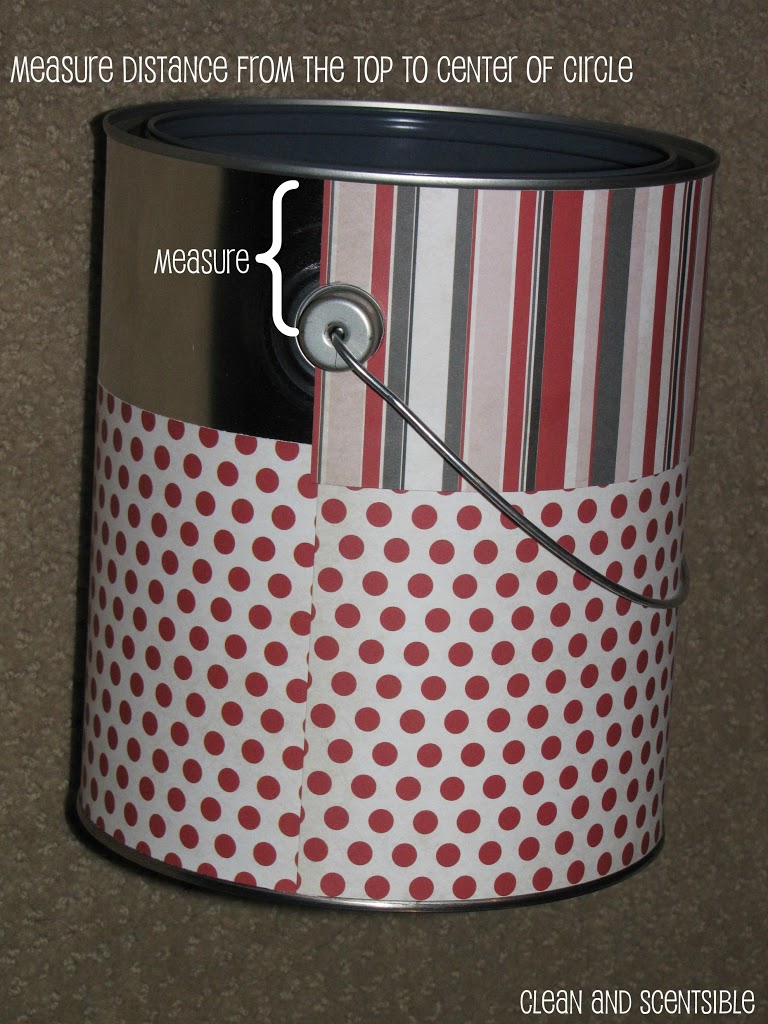
The little round knob happens to be the same size as a nickel {at least on my pain can}. Trust me, that nickel makes things much easier! Measure your paint can from the top {where the paper will hit} to the center of the round knob. Then measure this distance down on your paper and make a small mark. Line up you nickel and trace around it {Note: you will not be tracing a full circle since you are only cutting an opening for roughly half of the knob. You will need to do a little “eyeballing” here.}
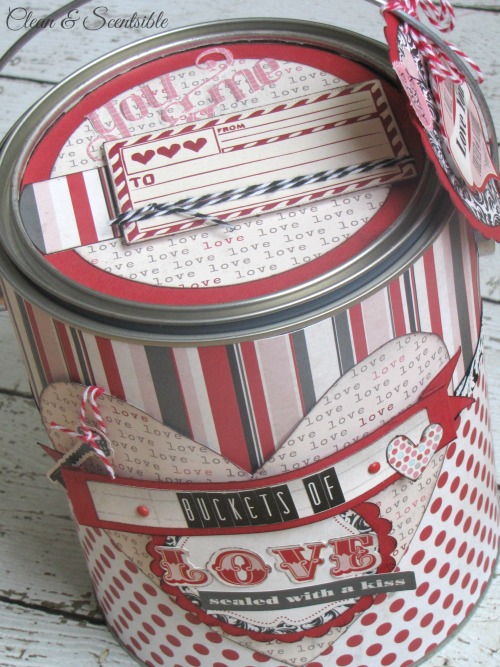
I then added a heart and some embellishments to the front…
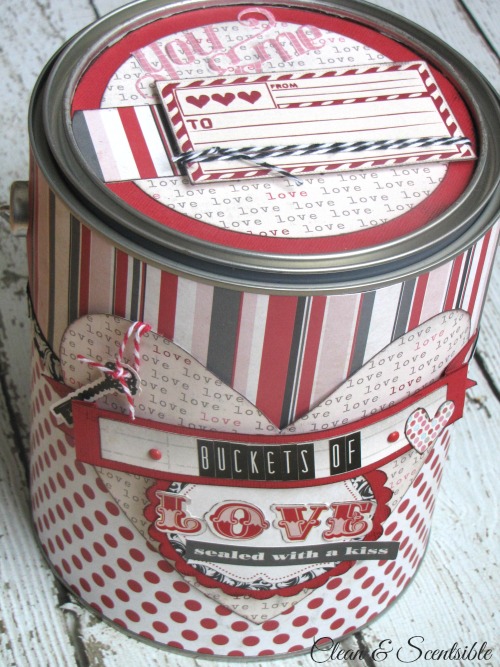
….decorated the top…
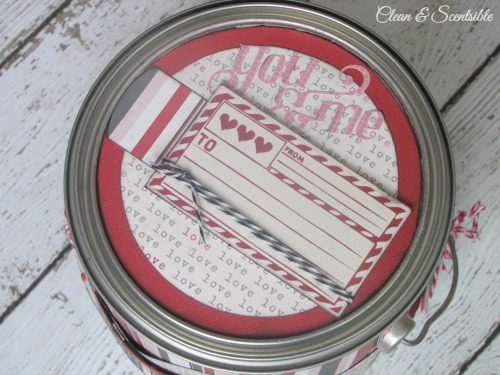
…and added a tag.
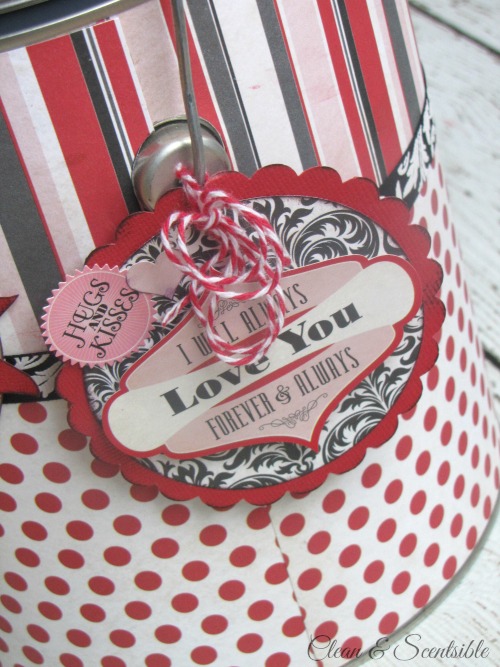
Other than the baker’s twine and ribbon, all supplies are either from Echo Park or My Mind’s Eye.
I hope you all have a great weekend. The forecast is for some snow around here {up to 30 cm over the next 5 days which is a lot for around here!} so I am already hoping for a snow day on Monday. Hopefully we will at least be able to get out for some sledding and a snowman or two!
This comment has been removed by the author.
Thanks so much for sharing this craft! I had no idea that you could buy empty paint cans. This opens a whole new world to me 🙂
Katie
This is so cute!!!
That is so cute! I can see myself wrapping presents in those! Love it.
Wow this is so cute! Thanks for sharing!
Hi Jenn! Just found your blog and I must say I love all your organizing and creative ideas! I’ve stayed here long enough to read through all your popular posts… and more! I’m now following you!
Love, Olga
P.S.: if you get a chance will you drop by my place and tell me what do you think?
Hi, I just found your blog recently. I love this idea with paint cans! I’ve done them for winter gifts. I’ll have to try this again. Your’s turned out so sweet! Thanks for sharing! I love the looks of your blog and all you have to offer! I’m following your blog now.
I’d be honoured if you’d check out my blog sometime 🙂
That is so cute…I’d love for you to share your project at CountryMommaCooks Link & Greet Party this weekend!
This is the cutest Valentine pail ever! I love seeing how you made it. Would you be willing to link it up to my Valentine Link Party going on now?! I’d love to have you! Thanks! http://michellepaige.blogspot.com/2012/01/rockin-valentine-valentine-link-party.html
Love the paint can! Thanks so much for sharing the tutorial with us! 🙂
Torri
PS Please come by my blog sometime, when you have a chance 🙂
what a fun idea – cool paper choices you made!
http://www.northerncottage.blogspot.com
This is darling – there is so many things I can do with this!
So cute, Jenn! I love those little paint buckets and this is such a cute idea! Thanks so much for sharing – I’m including a link in this week’s highlights! 😉
This is so cute! Thank you for including the directions.
Super cute! I just pinned it too!
This is such a fabulous project! I love the colors and all the detail! =)
Thank you for sharing this with us at Paper Issues! I featured you today! =) http://paperissues.blogspot.com/2012/01/buckets-of-love.html
my husband is a professional painter, he’s going to wonder where all of his empty can’s are going 🙂
wonderful project! I love altered cans and I really like how you did this 🙂
LOVE this PROJECT!!!! applause!!!! hugs…
This is so cute! I would love for you to share this with my Blog Stalking Thursday Linky Party! http://thecraftyblogstalker.blogspot.com/2012/01/blog-stalking-thursday-24.html
Soooo darn cute!!!!!!! I love it!!!
Check out my blog too:
thediydreamer.blogspot.com
I have been doing something similar with tins and lolly tubes. it is so good to up cycle don’t you think?
Lou
I love this!!
Thanks for linking up! I featured your post in my wrap up http://tidymom.net/2012/16-valentine-ideas/
Have a great weekend!
Ok, silly question, but how do you adhere the paper to the can?
Hi Amanda! You didn’t have an email address on your comment so I will just reply here. The paper is just adhered with a regular ol’ glue stick. I use a brayer to press it down but it’s probably not really needed. Just use LOTS of glue especially at the edges!
Thanks! I love this post, we were in Home Depot’s paint section the other day and I was looking at the cans wondering what I could do with them, then magically I found your page!
Saw these over on Today’s Creative Blog – super cute!!
Love this-So cute for kids to make for Valentines at school. Thanks
Very Cute! I love covering small pails, but have never thought about using larger paint cans. Thanks for sharing!
Terry Duncan
http://www.classycutupscreations.com
I can’t wait to make these with my boys! I’d love for you to submit this to the M&T Spotlight http://www.makeandtakes.com/spotlight
Oh I just LOVE this and that you’ve given instructions, I wouldn’t have a clue where to start lol. BEAUTIFUL project! Thanks so much for linking up with us over at Paper Issues, we’re so glad you joined in the fun! 🙂
Love the colors of this one! Very nicely put together and a fantastic mix of elements. Thanks for linking up at Paper Issues! Congratulations on being featured! 😀
What a pretty Valentine bucket! And thank you so much for teaching us how to make one ourselves. 🙂
Thanks for linking up over at Paper Issues, too!
Hi. I am linking to you in a round up I’m doing about great Valentine’s projects. I am linking to both this post and your site. If this is not acceptable, please just let me know. Love your project!
Marty@Marty’s Musings