It has been a very wet winter around here {with a few short-lived snow falls thrown in!}. Mr. Weatherman has not been very popular and there are still about 10 more days of rain in the forecast. Two boys with wet boots and hardwood floors don’t really go together too well and our poor floor is really taking a beating! I have been on the lookout for a nice boot tray for a while and finally came across one that fit all my criteria – stylish, functional, and easy to do!
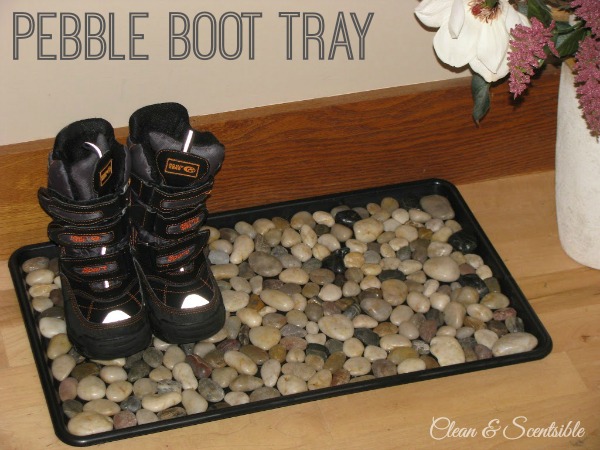
So here is my boot tray already in action:
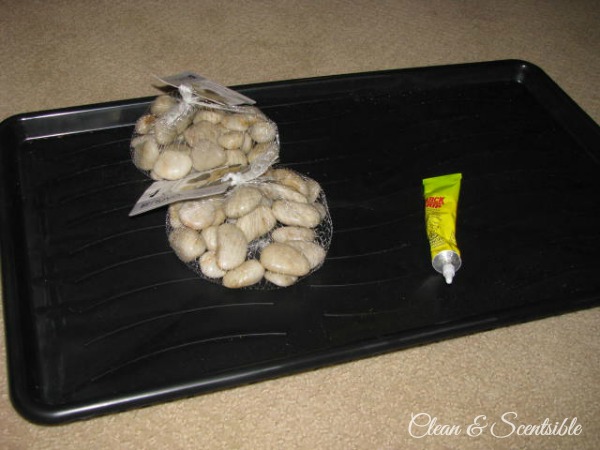
MATERIALS
- black rubber tray {purchased from the dollar store}
- river rocks {most of these were also purchased from the dollar store with a few taken from my backyard!}
- Quick Grip glue
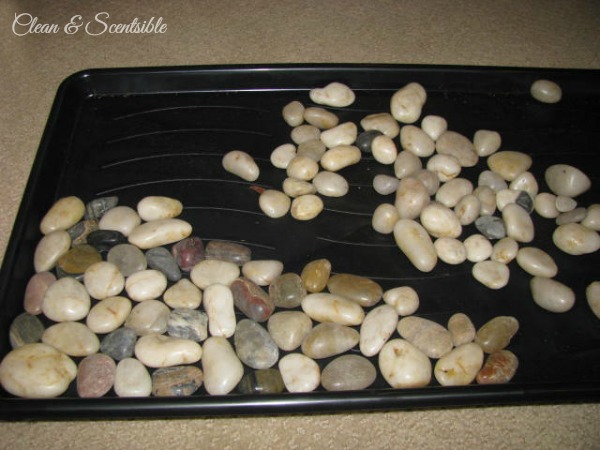
Start arranging the rocks in small sections until you get the pattern you like {it is kind of like fitting some puzzle pieces together!}
Now if you really want this project to be simple, you can just fill up the tray and leave it at that. I know my boys, however, and a tray full of loose rocks would be too tempting for them {can you say DISASTER??}. I can only imagine where these rocks would end up! Soooo…I opted to glue all of my rocks down. It did take a while to do {1 Gray’s Anatomy + 1/2 a Biggest Loser} but it was well worth it in my opinion.
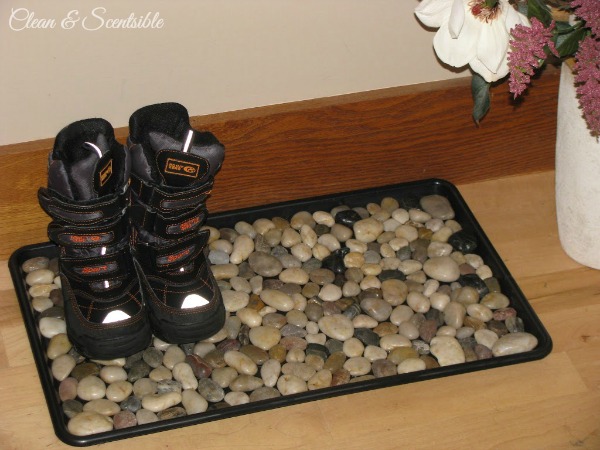
Now with a little training, the boys’ boots should make it to the tray {it is right beside the front door} and the puddles should stay off the floor! Not bad for about $5!
That’s a great idea! I found you on tator tots…
Wow what a fab idea and it looks great welldone tina xx http://www.scratchycatcrafter.blogspot.com
Your boot tray looks great!
What a great idea. I need one. Have a great day.
LOVE IT!!!!!!
Cute!! I was just thinking about making something like this with all the snow we’ve been having. Would love to see you at my weekend linky party!
GREAT IDEA! Thanks so much for sharing! Found you on Funky Junk SNS. 8>)
This is great! Such an inexpensive and chic idea!
Thanks for linking up to FFA!
Hannah @ http://youngancrafty.blogspot.com/
This is gorgeous! I love the look of this and it’s so functional too. I think glueing them down is the way to go because then in the spring (when it’s all gross and mucky) you can take the whole thing outside and spray it down with the hose. 🙂
What an incredible idea! I’m redoing my entry and going to buy the stuff to make this tomorrow. Thanks so much!
Great job! I definitely need to make something like this. I’m your newest follower and would love if you would follow me too!
http://ahomemadebykiki.blogspot.com
Ooooh! What a GREAT IDEA!!!
I just bought a boot tray this weekend, and figured I might have to spray paint it, since it’s BLACK and OBVIOUS in a lightly colored laundry room.
Now I might try pebbles too!
Oh my word…This is just what I need. I love this and will be making one soon!
I am soo excited that I came across your tutorial! I have had my eye on this rug found here:
http://www.gaiam.com/product/stone+accupressure+mat+in+sand+.do
But it’s sooo expensive and I like yours a lot better! Thank you so much! I have to make this!
So badly need one of these! Thanks for sharing, I’m featuring this on my Tuesday Treats post! Stop by and grab a button-
Wendy
http://www.wmcraftgoodies.blogspot.com
Simply creative! Love it! Please consider sharing at my new blog bash K.I.S.S.=Keep It Simple Sunday.
http://thetatteredtag.blogspot.com
That is so clever! My sons would definately be pulling the rocks out too! I would love for you to link up to my Sew Crafty Party & Giveaway!
http://wildflowersandwhimsy.blogspot.com/2011/01/sew-crafty-saturday-adventure-date.html
what a cool idea …pebble foot is great
Oh, my gosh, you are my HERO. Why, WHY didn’t I think of gluing them down??? I wanted to do this so badly, but I knew it would be the stupidest decision I’ve ever made with two three year olds running around, let alone a baby who would try to eat them… GLUE! GLUE! I’m totally doing it.
Thanks. 🙂
So cute! I have a few of those trays and a dollar store near by…. domesticdeadline.blogspot.com
I just came over from Craft Goodies and discovered that you live down the highway from my sister in Agassiz! You’ve had a LOT of rain this winter! (from my Calgary point of view anyways) Anyway, my boys are adults and i think I still should glue the rocks down. My laminate suffers every winter with the wet, though ours is snow. Thanks for the tutorial, I too wouldn’t have thought of glueing them down.
ok everyone where can I get the tray???? I can’t find one anywhere…. any suggestions???
No Way! I came up with this same idea! It has been a wet winter 🙁
I purchased my rocks at Hobby Lobby, I guess I should have checked the dollar store first, oh well. Great job, it looks fabulous!! check out mine at http://122designs.blogspot.com/2011/01/rock-for-your-thoughts.html
Sophia, if you can’t find any at the dollar stores I have seen them at Bed, Bath and Beyond as well (I think they were at least $10 though). I’m not sure where you live, but if you are in Canada they also have them at Superstore. I’m sure Target would carry something like this too? Good luck!
This is such a great idea that I never would have thought of! Ingenious!! 🙂
I would love it if you would come link up to my new party, “20 Below Thursday” which spotlights thrifty projects that are under $20!
http://christinasadventures2010.blogspot.com/2011/01/20-below-thursday-4.html
Saw this post on the Embellishing Life link party…what a great and simple idea! I hate wet and muddy boots on my floor 🙂
This really is genius! I would have to glue the rocks down, too, due to my own 7 year old rock lover!
What a great idea…and it looks nice too! I have seen the idea of using river rocks for summer foot baths, but I never thought to use them in a boot tray. Thanks for the inspiration.
OK, this is just the best idea!! Thanks for sharing.
This is a really good idea, and I love the natural look of the stones… beautiful. I featured you today on my favorite things 🙂
http://sunshineandchaucer.blogspot.com/2011/01/my-favorite-things_20.html
cute idea, I know what you mean about the rocks everywhere. We used to have a serenity fountain with pebbles and stones in it which has now been packed away until the kids can understand that they aren’t for touching!!!
I love this. I might make this for my dad for his birthday!
Also… come check out ‘Fun for Kids Friday’ http://www.localfunforkids.com/
Love this! I already have the tray, just need the rocks. Found you on Hookin Up with HOH.
Great Idea!! With 5 kids plus daycare, I REALLY need to make a few of these 🙂
So cute! I will be featuring your project this Thursday at my weekly link party, Hookin Up with HoH #34.
I’m letting you know in advance as I’ll be out of town during the party and will be unable to notify you on Thursday.
Please feel free to stop by and grab a button on Thursday!
~Allison @ House of Hepworths
Great idea, Jenn! Love it. Maybe I can help you do the growth chart and you can help me lay these rocks out…..? – Jen M.
This wld also work (and be a good idea) used in those plastic round drip pans you use for under plants! Very earthy and nature looking indoors or out! =)
I featured this today! Hooray! Swing by! 🙂
Amanda
http://www.todaystoptwenty.blogspot.com
I soooo need to do this! I already have the rocks AND the tray! So cute!
too cute-going to have to get a tray and some rocks this weekend.
thanks for the inspiration
AH! I have wanted to do this FOREVER but couldn’t b/c my boys will take all of the rocks! So simple I LOVE it!! May have to copy:)
I have never seen this before and all I can say is WOW you ROCK !! Hee hee hee 🙂 Thanks for the inspiration.
Stephanie (http://fullofgreatideas.blogspot.com)
Oh my goodness- i need that! What a cute way of keeping things where they belong!
http://www.smallfineprint.com
so much nicer that my plain rubber mat! what a great idea ^_^
I Love this! I found you via The Shabby Chic Cottage’s Idea files.
Where did you find a rubber tray?? I’m very interested in making a couple of these!
Absolutely love this!! I have this on my list!! Thanks!!
Love your projects! Featured 2 of them on my FB page! 🙂
I love this idea, I have two small boys myself and at first I was thinking those pebbles would be everywhere, great idea to glue them.
I love this idea and without even reading the post I knew I already seen the tray at my local dollar store and the rocks would be there or I could always pick up at Walmart, again without reading the post yet I thought they were just laid in the tray and when I’m store I was looking at the rocks thinking my bad beagle would get these and make a mess or swollow them and cost me big money lol so I thought maybe I should glue them down and be safe it’s so funny I finally read the whole post and seen you decided to do the same thing I love your blog and plan or adding this to my blog at charmcitycreativedesigns.wordpress.com and a mention of your bl
We are manufatures of Boot Tray from India pls email me in info@pobji.com so can sent more information for boot tray mats
I absolutely love this idea so I tried it but everytime I move it to clean the floor the tray bends slightly and the rocks come unglued, any suggestions on how I could fix this?
Jenn, this is seriously cool! Have to pin immediately,lol. thanks,Di
I found this via your top organization posts. This would make an awesome house warming gift! I got these trays free after a mail in rebate a few months ago and now I know what I am using them for!! I know this is old, but I would love this or your referring post linked up at my blog party: Pin Me Linky Party
I think your river rock projects may have been one I saw on Pinterest that inspired the Michigan State trivet I made of river rocks as a gift.
It didn’t photograph well with my old cell phone, but here’s a pic and directions if anyone’s interested.http://giftsgatheringsandgusto.blogspot.com/2013/07/a-gift-that-rocks-michigan-state-trivet.html.
I didn’t expect it to turn out as great as it did, I was really happy with the results! Thank you for the inspiration!
Jenn, what a beautiful idea. We love nature, so this is right down our alley. We have the rocks and the tray, so I will be doing this project real soon as soon as I can get a minute. Thanks for the inspiration.
Sheila
It’s always great to be able to do projects with materials already on hand! Hope you like it!
I saw these ideas on Pinterest and thought to myself, these people don’t have kids and especially don’t have boys because my boys would have the rocks all over the house! I’ll definitely be using your method and gluing them down! Also loved your measurement of time it took to glue it down. Haha Thanks so much for the great tutorial!